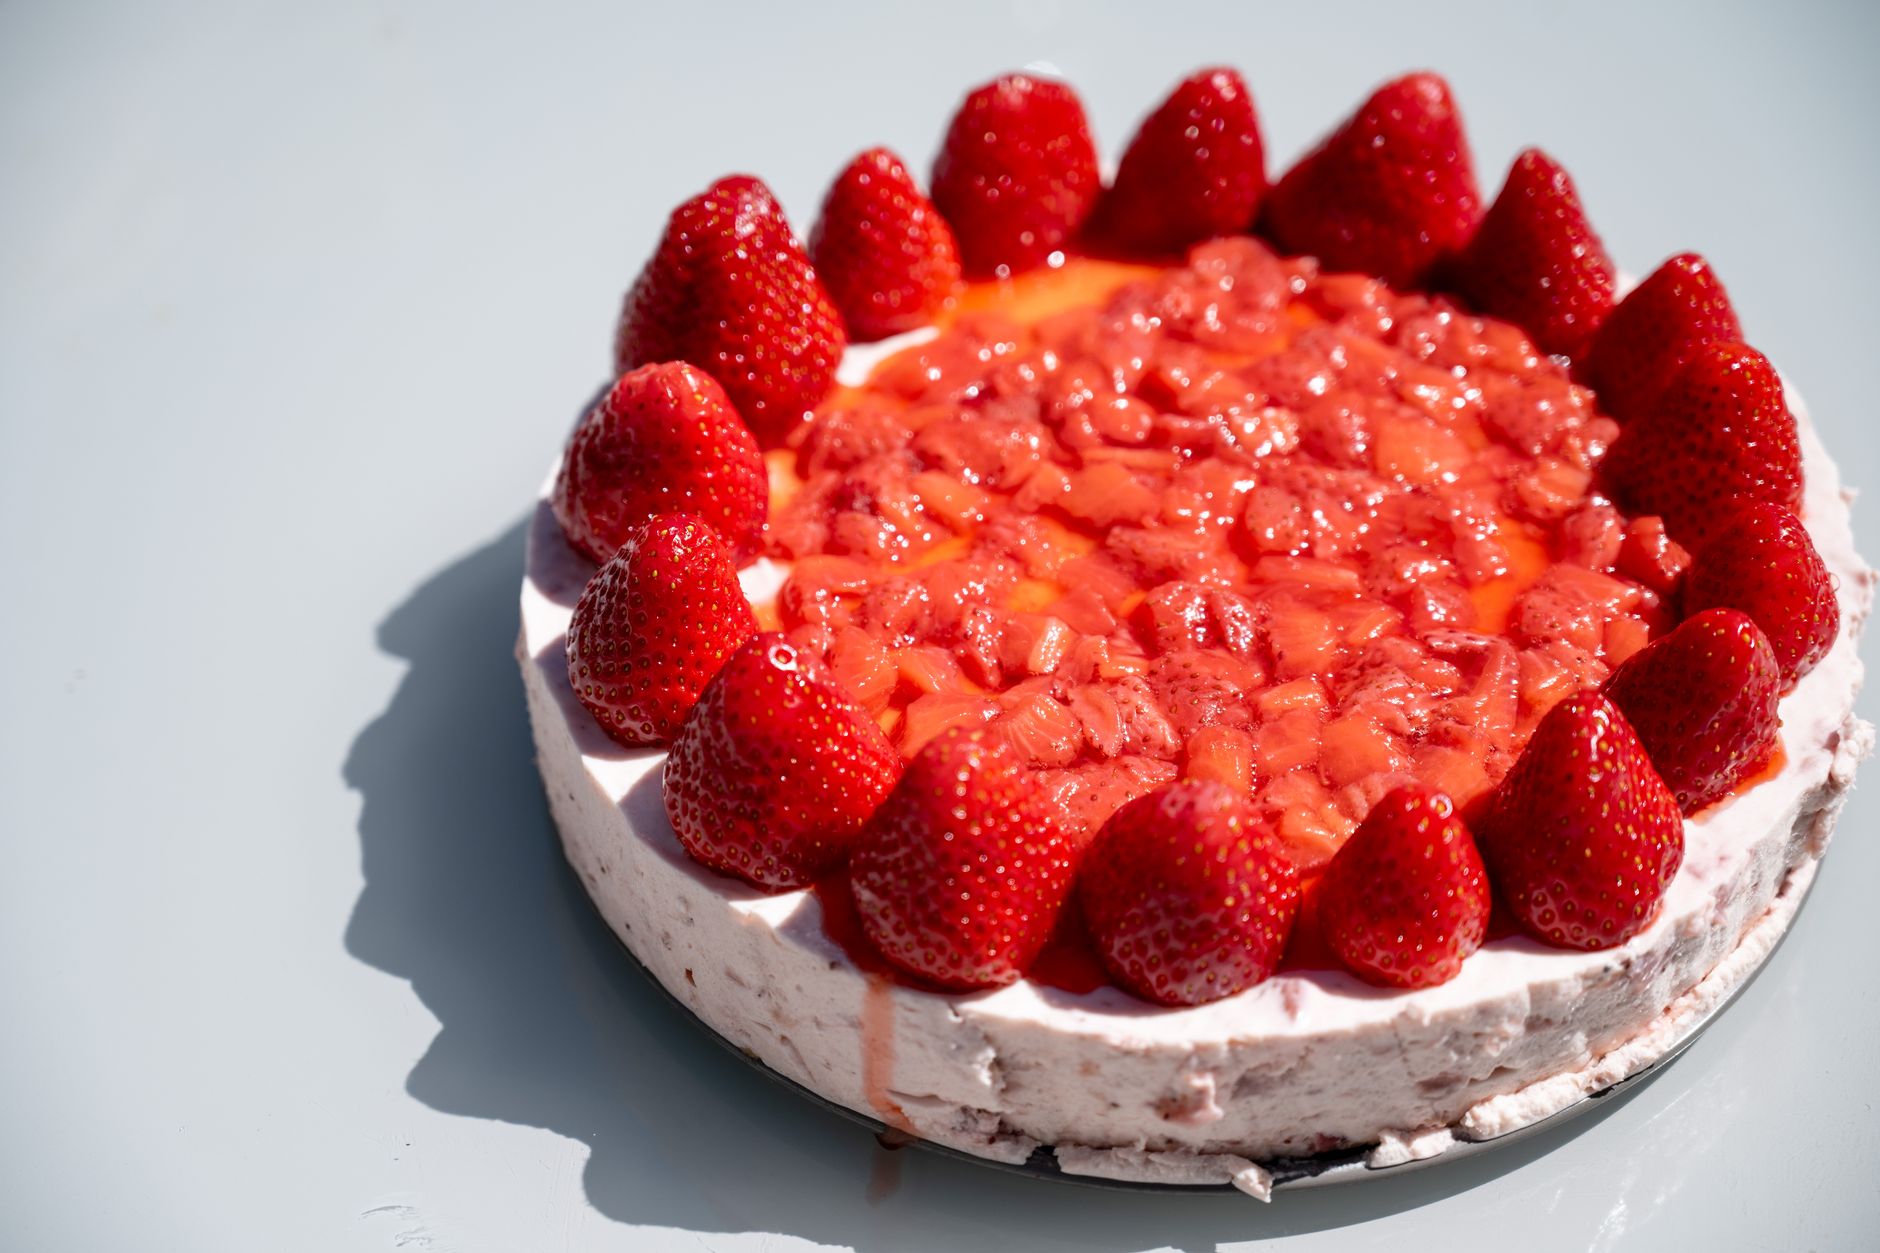
Easy Strawberry Cheesecake No Bake
This easy strawberry cheesecake no bake recipe is the kind of dessert you make once and then get asked for the recipe all summer long. It has a buttery graham cracker crust, an ultra-creamy cheesecake filling, and a generous crown of juicy strawberries—all without turning on the oven.
Why You’ll Love This Recipe
- Truly no bake – perfect for hot days when you don’t want to heat up the kitchen.
- Beginner friendly – simple, step-by-step method with no water bath or special equipment.
- Ultra-creamy texture – a mix of cream cheese and whipped cream gives a light, mousse-like bite.
- Make-ahead friendly – sets up perfectly in the fridge, ideal for parties and holidays.
Ingredients
- 1 1/2 cups (150g) graham cracker crumbs (about 10–12 full sheets, finely crushed)
- 3 tablespoons (38g) granulated sugar (for the crust)
- 6 tablespoons (85g) unsalted butter, melted (cooled slightly)
- 24 oz (680g) cream cheese, full-fat block (softened to room temperature)
- 3/4 cup (90g) powdered sugar (also called icing sugar)
- 2 teaspoons vanilla extract
- 2 tablespoons (30ml) fresh lemon juice (brightens the flavor)
- 1/8 teaspoon salt (just a pinch to balance sweetness)
- 1 cup (240ml) heavy whipping cream (cold, 35% fat or higher)
- 2 1/2–3 cups (350–400g) fresh strawberries, sliced (plus a few whole berries for garnish)
- 1/3 cup (100g) strawberry jam or preserves (for glossy topping, optional)
- 3 tablespoons (45ml) cold water (for blooming gelatin, optional but helps slice cleanly)
- 1 1/2 teaspoons (about 5g) unflavored powdered gelatin (optional, for a firmer no-bake set)
Instructions
- Lightly grease a 9-inch (23cm) springform pan and line the bottom with parchment paper for easier slicing and removal.
- Make the crust: In a medium bowl, combine the graham cracker crumbs, 3 tablespoons (38g) granulated sugar, and melted butter. Stir until the mixture resembles damp sand and holds together when squeezed.
- Press the crust: Pour the crumb mixture into the prepared pan. Using the bottom of a flat measuring cup or glass, press firmly and evenly into the bottom and slightly up the sides. Chill in the refrigerator for at least 20–30 minutes while you prepare the filling.
- Optional gelatin step for a firmer cheesecake: In a small microwave-safe bowl, sprinkle the gelatin over 3 tablespoons (45ml) cold water. Let stand for 5 minutes to bloom. After blooming, microwave for 8–10 seconds just until the gelatin dissolves and the mixture is clear. Let it cool to lukewarm while you prepare the filling, ensuring it does not set.
- Beat the cream cheese: In a large mixing bowl, add the softened cream cheese. Using a hand mixer or stand mixer fitted with the paddle attachment, beat on medium speed for 2–3 minutes until completely smooth and free of lumps. Scrape down the sides of the bowl as needed.
- Add sweetness and flavor: Add the powdered sugar, vanilla extract, lemon juice, and a pinch of salt to the cream cheese. Beat on medium speed for another 1–2 minutes until smooth, creamy, and slightly fluffy.
- Whip the cream separately: In a chilled bowl, pour in the cold heavy whipping cream. Using clean beaters or the whisk attachment, whip on medium-high speed until medium-stiff peaks form, 3–4 minutes. The whipped cream should hold its shape but still look smooth and not grainy.
- Incorporate gelatin (if using): With the mixer on low speed, slowly stream the lukewarm dissolved gelatin into the cream cheese mixture, mixing just until combined. Do not add gelatin if it has cooled and thickened; gently re-warm for a few seconds if needed before using.
- Fold in the whipped cream: Using a rubber spatula, gently fold the whipped cream into the cream cheese mixture in two additions. Use broad, sweeping motions to avoid deflating the cream, folding just until no streaks remain and the filling is light and smooth.
- Fill the crust: Remove the chilled crust from the refrigerator. Spoon the cheesecake filling onto the crust and spread it into an even layer, smoothing the top with an offset spatula. Tap the pan gently on the counter a few times to release any large air bubbles.
- Chill to set: Cover the pan tightly with plastic wrap or foil. Refrigerate for at least 6 hours, or preferably overnight, until the cheesecake is firm enough to slice cleanly.
- Prepare the strawberry topping: Shortly before serving, wash, dry, and hull the strawberries. Slice most of them and leave a few whole for decoration. If you like a glossy finish, warm the strawberry jam in a small saucepan or microwave-safe bowl until just fluid, 10–15 seconds, then let it cool slightly.
- Top the cheesecake: Run a thin knife around the edge of the chilled cheesecake and release the springform ring. Arrange the sliced strawberries generously over the top of the cheesecake, piling them slightly in the center. Drizzle or brush the warm (but not hot) strawberry jam over the berries for a shiny finish.
- Garnish and serve: Garnish with whole strawberries or thin lemon slices if desired. Slice with a sharp knife, wiping the blade clean between cuts for neat slices. Serve chilled and enjoy your easy no bake strawberry cheesecake.
Pro Tips & Variations
- Use full-fat cream cheese for the best texture; low-fat versions can make the filling softer and less stable.
- Chill long enough – overnight chilling gives the cleanest slices and the most developed cheesecake flavor.
- Flavor swap – replace lemon juice with 2 tablespoons (30ml) of strawberry puree for an extra strawberry twist in the filling.
- Crust variations – try crushed digestive biscuits, vanilla wafers, or chocolate cookies instead of graham crackers for a different flavor profile.
Storage & Serving
Store leftover no bake strawberry cheesecake covered in the refrigerator for up to 4 days. For best texture, keep it tightly wrapped so it does not absorb fridge odors and the strawberries stay fresh. If you plan to make it ahead more than 24 hours, add the strawberry topping just before serving to keep the fruit vibrant. For longer storage, freeze the cheesecake (without fresh strawberries on top) for up to 2 months: chill until firm, wrap well, and freeze. Thaw overnight in the fridge, then top with fresh berries right before serving.
Nutrition (per serving)
Calories: 430 | Protein: 6g | Carbs: 38g | Fat: 28g | Fiber: 1g
Frequently Asked Questions
Can I make this easy strawberry cheesecake no bake without gelatin?
Yes. The cream cheese and whipped cream provide enough structure for a soft-set cheesecake. Skip the gelatin step and chill overnight. The slices will be slightly softer but still hold together if well chilled.
Can I use frozen strawberries instead of fresh?
For the topping, fresh strawberries give the best flavor and texture. If you only have frozen berries, thaw them completely, drain well, and use them to make a quick sauce or compote to spoon over each slice instead of piling them on top.
Can I make this no bake cheesecake ahead of time?
Absolutely. This dessert is perfect for making ahead. Prepare the crust and filling up to 24 hours in advance and refrigerate. Add the strawberries and jam topping within a few hours of serving for the freshest look and taste.
What size pan should I use for this recipe?
This recipe is designed for a standard 9-inch (23cm) springform pan. You can also use a deep 8-inch (20cm) springform pan, but the cheesecake will be taller and may need an extra hour of chilling to fully set.
Why is my no bake cheesecake runny?
Common reasons include using low-fat cream cheese, not whipping the cream to medium-stiff peaks, or not chilling long enough. Make sure to use full-fat cream cheese, whip the cream properly, and chill for at least 6 hours, preferably overnight.
You Might Also Like
- no bake berry desserts
- easy cheesecake recipes
- summer strawberry recipes